Six simple steps. One project workspace, always ready.
Create a Desktop for a project. Build Main Tabs and Sub-Tabs, drag in your resources, organize the Items you need, then switch between independent Desktops and stay focused. Everything you need for the next task stays within reach.
22 source-checked tutorials • Actual V16 screens • Practical instructions
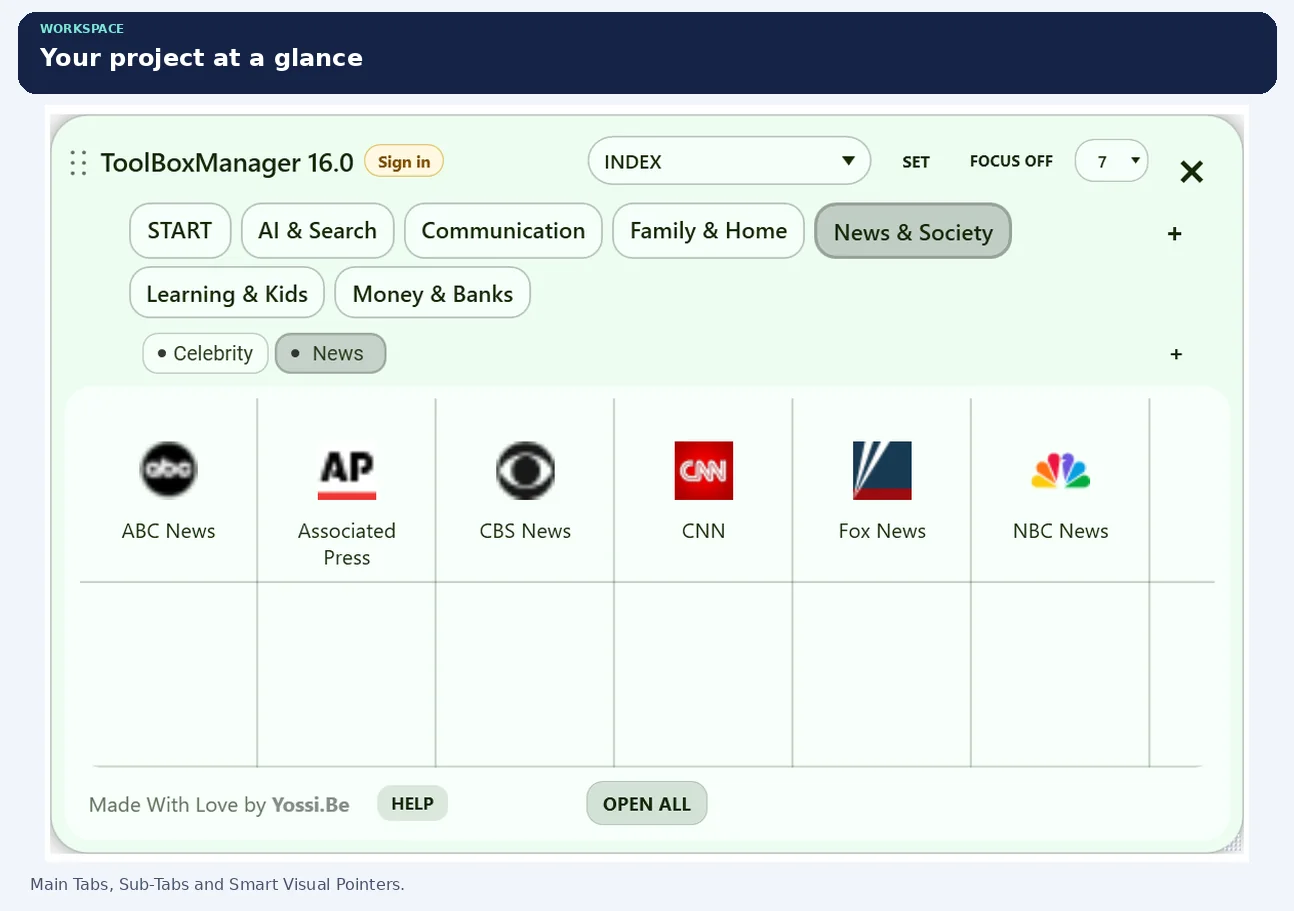
THE REAL V16 WORKSPACE · Main Tabs, Sub-Tabs and Items
UNDERSTAND THE METHOD
Your visual cheat sheet: six simple moves
These are the same six steps shown on the official ToolBoxManager homepage. Follow them in order, or open any step for the detailed instructions.
THE BIG PICTURE
A project (Desktop) is one independent TBM workspace. Each Desktop holds its own Main Tabs, Sub-Tabs, Items and Notes. Switch whenever you need a different working environment.
Follow these six actions in the app. Every step links directly to its full illustrated lesson.
Your first goal: one Desktop, one Main Tab, one Sub-Tab, a useful Item, and one Note. No previous experience needed.
01DESKTOPYour project workspace
→
02MAIN TABThe broad area
→
03SUB-TABThe category
→
04ITEMS + NOTESThe actual resources
01
Choose or create your Desktop
In TBM’s top bar, click the Desktop name to open the Desktop Switcher. Choose an existing Desktop. To make your own, select Open Desktop Management, click + Add NEW Desktop, type “MY FIRST DESKTOP”, confirm, and click Done. Open the Desktop Switcher again and select your new Desktop.
Right-click the top Main Tab strip and choose New tab, or use the + next to that strip. Name it “PLANNING” and confirm. Your new Main Tab becomes a section inside the selected Desktop.
Select PLANNING. Right-click its Sub-Tab row and choose New sub-tab, or use the + beside that row. Name it “RESEARCH” and confirm. Click RESEARCH to open its Item canvas.
Open File Explorer alongside TBM. Drag a document or folder onto the empty RESEARCH canvas. The new Item points to your original resource; it does not move the source file.
Add another file or website. Hold Shift while clicking the Items you need, then click OPEN SELECTED. To focus the tab row, try FOCUS OFF/ON. Your Desktop will still be there when you return.
YOU ARE DONE WHENThe Desktop Switcher shows “MY FIRST DESKTOP”; PLANNING → RESEARCH contains an Item and a Note. You can click either one again whenever you return.
THE STRUCTURE EXPLAINED
How the hierarchy works across multiple Desktops
A Desktop is the workspace for one project. Choose a Desktop in the switcher to see its own Main Tabs, Sub-Tabs and Items. Switch to a different Desktop and you see a different set of work, without mixing your resources.
MULTI-DESKTOP WORLDEach Desktop is a complete, independent workspace for one project or area of work.
MULTI-DESKTOP STRUCTURE · Every Desktop has its own complete workspace
◆
DESKTOP (PROJECT) 1MARKETING
Main Tab · CAMPAIGNSub-Tab: BRIEF → ItemsSub-Tab: RESEARCH → Items
Main Tab · RESEARCHSub-Tab: SOURCES → ItemsSub-Tab: NOTES → Items
TRY IT: CLICK THROUGH THE STRUCTURE
Choose a Desktop below, then a Main Tab and Sub-Tab. Notice how every selection changes the visible Items. The other Desktops stay separate.
DESKTOP SWITCHER
ACTIVE DESKTOP: MARKETING
MAIN TABS
SUB-TABS
ITEMS IN THIS SUB-TAB
YOU DECIDE HOW DEEP TO ORGANIZE: Keep Items directly in a Main Tab when your work is simple, or add Sub-Tabs for more detail. Create several Main Tabs inside each Desktop. The flexible structure adapts to your workflow, not the other way around.
Choose the amount of structure that fits your work
Simple setup
Keep Items on a Main Tab’s own canvas when that is all you need.
Desktop → Main Tab → Items
More categories
Create Sub-Tabs inside a Main Tab to separate clients, stages or topics.
Desktop → Main Tab → Sub-Tab → Items
Many areas
Use several Main Tabs, each with its own Sub-Tabs and Items. Switch to another independent Desktop at any time.
Desktop Switcher ⇄ Many Desktops
TBM is designed to fit the way you work, rather than make you follow a rigid filing system. A Desktop keeps its own working environment; Main Tabs, Sub-Tabs and Items can be as simple or as detailed as the job requires.
THE KEY IDEA
Smart Visual Pointers: organize without moving your originals
Bring scattered Windows and browser resources together without changing your existing folder structure.
SMART VISUAL POINTERS · Originals stay in their existing locations
ORIGINALS REMAIN WHERE THEY ARE
📄Brief.pdfDocuments folder
📁Creative assetsWindows Explorer
🌐Research websiteBrowser URL
📝Selected textBrowser or supported app
DRAG INTO TBM→No move, no duplicate of the original
TBM DESKTOP · PROJECT
MAIN TAB: RESEARCH
SUB-TAB: SOURCES
📄Brief.pdf
📁Assets
🌐Website
📝Note
Click an Item to open its original resource
1 · DRAGBring a resource into TBM.
2 · ORGANIZEChoose its Main Tab, Sub-Tab and position.
3 · OPENLaunch the original whenever you need it.
An Item is what you select, rearrange, move, copy or remove inside TBM. Its Smart Visual Pointer opens the original resource; it does not relocate that file or folder. A Note is also an Item, but contains your saved text.
Choose a Desktop (your project workspace), then give it useful tabs and a comfortable window size.
TUTORIAL 21 / 22
Switch quickly between Desktops
Jump from one project environment to another without closing and reopening ToolBoxManager. Each Desktop has its own organized tabs and Items.
Follow these steps
1
Find the Desktop selector in the top bar; it normally displays the current Desktop name.
2
Click its arrow to open the list of visible Desktops.
3
Select the Desktop you want to work in (for example, INDEX or SAMPLE PROJECT).
4
Check that the Main Tabs, Sub-Tabs and Items change to that Desktop's saved workspace.
5
Use the same selector to move back to your previous Desktop at any time.
6
If a Desktop is missing from the list, use Open Desktop Management to check whether its visibility checkbox is cleared.
YOUR RESULT
The chosen project Desktop becomes active without losing the previous Desktop's organization.
REAL V16 DEMONSTRATIONQuick switching between desktops and projects.mp4
TUTORIAL 14 / 22
Manage Desktops: reorder, delete, duplicate, and rename
Use Desktop Management to keep separate project environments clearly named and in the right order. A Desktop contains its own Main Tabs, Sub-Tabs and Items.
Follow these steps
1
Open the Desktop selector and choose Open Desktop Management.
2
Click + Add NEW Desktop to create an empty project Desktop; enter its name and confirm.
3
To rename an existing Desktop, click Rename on that Desktop row, enter the new name, and save.
4
To create a full copy, click Duplicate, choose a unique name, and confirm.
5
Drag the dotted handle at the beginning of a Desktop row to reorder the Desktops.
6
If a Desktop is no longer needed, click Delete and confirm the warning. Check carefully before deleting a Desktop with valuable content.
7
Click Done; the Desktop selector now reflects the revised order and names.
YOUR RESULT
The Desktop collection reflects your preferred project names and order.
REAL V16 DEMONSTRATIONN04 Desktop Management create duplicate reorder.mp4
TUTORIAL 15 / 22
More Desktop Management controls
Desktop Management also controls which project Desktops appear in the fast switcher. Hiding a Desktop is useful when you want fewer choices without deleting a project.
Follow these steps
1
Open the top Desktop selector and choose Open Desktop Management.
2
Find the checkbox to the left of each Desktop name. A checked Desktop is shown in the quick Desktop selector.
3
Clear the checkbox for a Desktop you want to hide from the quick selector; keep at least one Desktop visible.
4
To bring it back, select its checkbox again.
5
If you need a separate working copy instead, use Duplicate on its row, name the copy and confirm.
6
Click Done, then open the Desktop selector to verify the visible project list.
YOUR RESULT
The Desktop selector displays only the Desktops you chose to show, while hidden project data remains saved.
REAL V16 DEMONSTRATIONN04 B MORE Desktop Management.mp4
TUTORIAL 10 / 22
Create a Main Tab and nested Sub-Tabs
Create a simple, reusable hierarchy from scratch. A Main Tab represents a major topic or project stage; its Sub-Tabs separate smaller categories.
Follow these steps
1
Choose the Desktop where the new structure should live.
2
Click the + button beside the Main Tab row, or right-click the Main Tab row and choose New tab.
3
Type a clear Main Tab name and confirm it.
4
Select the new Main Tab so its Sub-Tab row becomes active.
5
Click the + button beside the Sub-Tab row, or right-click and choose New sub-tab.
6
Enter the Sub-Tab name and confirm; repeat to add the other categories you need.
7
Click each Sub-Tab to make sure its canvas is ready to receive files, links and Notes.
YOUR RESULT
A new Main Tab with one or more focused Sub-Tabs is ready for your Items.
REAL V16 DEMONSTRATIONCreating tabs and sub-tabs.mp4
TUTORIAL 01 / 22
Resize the ToolBoxManager window
Make the workspace large enough for your project and small enough to stay out of your way. You can resize the ToolBoxManager window without changing your tabs or Items.
Follow these steps
1
Open ToolBoxManager so the main workspace is visible.
2
Place the mouse on an outside edge or corner of the window until the resize pointer appears.
3
Hold the left mouse button, drag inward to make the window smaller or outward to make it larger, and release.
4
For a different screen position, drag the dotted handle at the top-left of the ToolBoxManager window.
5
Check that the Desktop selector, Main Tabs, Sub-Tabs and Item canvas remain accessible at the new size.
YOUR RESULT
The resized workspace stays usable; TBM remembers its expanded-window layout.
REAL V16 DEMONSTRATIONAdjusting the software window to our preference using the mouse.mp4
GUIDED WALKTHROUGHS
Collect and create
Add files, websites and Notes to the correct Sub-Tab canvas.
TUTORIAL 02 / 22
Save website links by dragging
Keep a useful website beside your project without copying the webpage or moving anything on your computer. TBM creates a clickable Item for the link.
Follow these steps
1
In ToolBoxManager, choose the Desktop, Main Tab and Sub-Tab where the website belongs.
2
Open the website in your browser and place the browser beside TBM so the canvas is visible.
3
Drag the webpage address or an actual webpage link from the browser onto an empty area of the TBM canvas.
4
Release the mouse over the canvas and wait for the new website Item to appear.
5
Check the Item label and website icon, then click the Item to reopen the original website.
YOUR RESULT
A website Item is stored in the chosen Sub-Tab; the website itself remains online.
REAL V16 DEMONSTRATIONC01 Drag a website link into TBM.mp4
TUTORIAL 03 / 22
Drag files and folders from Windows Explorer
Add Windows documents, application files or folders to your workspace as convenient visual shortcuts. The original files and folders stay in their current locations.
Follow these steps
1
Choose the intended Desktop, Main Tab and Sub-Tab in TBM.
2
Open Windows File Explorer and locate the file, folder or Windows-supported application you want to organize.
3
Arrange Explorer and TBM so you can see the Item canvas.
4
Drag the file or folder from Explorer to the canvas and release it.
5
Repeat for another resource if needed; check that each new Item displays a useful label or icon.
6
Click the new Item to open its original file, folder or application with Windows.
YOUR RESULT
TBM holds pointers to the resources, without relocating or duplicating the source files.
REAL V16 DEMONSTRATIONC02 Drag a file and folder from Windows Explorer.mp4
TUTORIAL 04 / 22
Create a Note from selected browser text
Turn useful text from a webpage into a Note that stays alongside the related project resources. This is helpful for research excerpts, reminders and decisions.
Follow these steps
1
Open the relevant Desktop and Sub-Tab, leaving the canvas visible.
2
In the browser, highlight the text you want to keep.
3
Drag the selected text from the browser to an empty place on the TBM canvas.
4
Release the text. TBM creates a Note Item and stores the selected words.
5
Double-click the Note to review or edit its contents; select Save when you finish.
6
When dragging an actual hyperlink rather than selected text, expect TBM to create a website Item instead of a Note.
YOUR RESULT
The selected text is available as a Note in the current Sub-Tab, with the source URL retained when available.
REAL V16 DEMONSTRATIONC03 Drag selected browser text to make a Note.mp4
TUTORIAL 16 / 22
Create, edit, and format a Note
Notes are editable Items for ideas, instructions, reminders and project context. You can format important lines to make a busy workspace easier to scan.
Follow these steps
1
Open the Desktop, Main Tab and Sub-Tab where your Note belongs.
2
Double-click an empty area of the Item canvas to create a new Note and open the editor.
3
Type or paste your text into the large editing area.
4
Select text you want to emphasize, then use the editor toolbar for font size, Bold, Italic, color or a bulleted list.
5
Use the symbol picker when an arrow or visual marker makes the Note easier to read.
6
Click Save to close the editor and keep the Note on the canvas.
7
Double-click the Note later, or right-click it and choose Edit note, to revise its contents.
YOUR RESULT
A formatted, editable Note is saved with the rest of the current Sub-Tab.
REAL V16 DEMONSTRATIONN06 Notes create edit and format.mp4
GUIDED WALKTHROUGHS
Organize Items and tabs
Select, move, copy, reorder and remove TBM Items without disturbing original source files.
TUTORIAL 05 / 22
Reposition and select Items on the canvas
Keep frequently used Items in a clear, recognizable order. Repositioning Items changes only their arrangement inside the current Sub-Tab.
Follow these steps
1
Open the Sub-Tab containing the Items you want to arrange.
2
Press and hold an Item, then drag it to its new place among the visible Items.
3
Release the mouse and confirm the Item appears in the intended position.
4
For a small move, right-click an Item and use Move left or Move right.
5
Repeat as necessary so the first Items are the ones you need most often.
YOUR RESULT
The Item order is updated in TBM. The original files and websites are not changed.
REAL V16 DEMONSTRATIONC04 Reposition items on a canvas.mp4
TUTORIAL 06 / 22
Move Items using Main Tabs and Sub-Tabs
File an Item into the correct subject area without recreating it. Main Tabs are broad subjects; Sub-Tabs hold the focused groups within them.
Follow these steps
1
Find the Item on the canvas in its current Sub-Tab.
2
To move it to another Main Tab, hold the Item and drag it directly onto the destination Main Tab button.
3
Release the mouse. TBM places it in the destination Main Tab's active Sub-Tab.
4
To choose a more specific destination, drag an Item directly onto the required Sub-Tab button.
5
Open the destination and check that the Item appears there.
6
If you want a copy instead of a move, hold Shift while dragging the Item to its destination.
YOUR RESULT
The Item is moved or copied to the selected location; the pointer still opens the same resource.
REAL V16 DEMONSTRATIONC05 Drag an item to a Main Tab and Sub-Tab.mp4
TUTORIAL 07 / 22
Reorder Main Tabs and Sub-Tabs
Change the order of your Main Tabs and Sub-Tabs as a project develops. This lets you keep the current priorities at the beginning of each row.
Follow these steps
1
Open the Desktop whose tabs you want to organize.
2
Hold a Main Tab button and drag it left or right along the Main Tab row.
3
Release it at the new position and confirm the tab order.
4
Select the relevant Main Tab to display its Sub-Tab row.
5
Hold a Sub-Tab button and drag it to a different position in that row.
6
Release and verify the Sub-Tab order without changing its Items.
YOUR RESULT
The two tab rows now follow your preferred working order.
REAL V16 DEMONSTRATIONC06 Reorder Main Tabs and Sub-Tabs.mp4
TUTORIAL 08 / 22
Select, move, copy, and remove Items
Work with several Items at once, including moving, copying, opening or removing a group. Removing an Item from TBM does not delete its original file.
Follow these steps
1
Open the Sub-Tab containing the Items you want to work with.
2
Hold Shift and click each required Item to add it to the selection. You can also drag a selection box across multiple Items on empty canvas space.
3
Check that all intended Items are highlighted before continuing.
4
To move the group, drag one selected Item to another position or destination tab.
5
To copy the group, hold Shift while dragging a selected Item to its destination.
6
To remove the group from TBM, right-click a selected Item and choose Remove selected items, or press Delete and follow the confirmation.
YOUR RESULT
The selected Items are moved, copied or removed from the workspace as requested; original resources are untouched.
REAL V16 DEMONSTRATIONC07 Select several items, copy and remove safely.mp4
TUTORIAL 19 / 22
Move a Main Tab to a different Desktop
Move an entire Main Tab to another Desktop when a subject becomes part of a different project. All Sub-Tabs and Items inside it travel together.
Follow these steps
1
Make sure a second Desktop already exists and the source Desktop has more than one Main Tab.
2
Open the source Desktop and select the Main Tab you want to move.
3
Right-click the Main Tab button and choose Move to Desktop...
4
In the destination dialog, choose the Desktop that should receive the tab and confirm.
5
Read the success message, then use the Desktop selector to open the destination Desktop.
6
Check that the Main Tab and all its Sub-Tabs and Items are present there.
YOUR RESULT
The Main Tab is moved with its entire contents. The source Desktop keeps its remaining Main Tabs.
REAL V16 DEMONSTRATIONO02 Move a Main Tab to another Desktop.mp4
GUIDED WALKTHROUGHS
Focus and launch
Show less on screen, open sets of resources and restore the floating window when needed.
TUTORIAL 11 / 22
Use Focus ON and Focus OFF
Use Focus when many Main Tabs compete for attention. Focus hides extra Main Tab buttons from view but does not delete any content.
Follow these steps
1
Choose the Desktop you want to concentrate on.
2
In the top bar, locate FOCUS OFF and the small number selector beside it.
3
Choose how many Main Tabs should remain visible while Focus is active (for example, 2).
4
Click FOCUS OFF to turn the mode on; the button changes to FOCUS ON.
5
Work with the reduced Main Tab row while your hidden tabs remain stored.
6
Click FOCUS ON to return to FOCUS OFF and display all Main Tabs allowed by your license tier.
YOUR RESULT
The Main Tab strip switches between a compact Focus view and the regular view.
REAL V16 DEMONSTRATIONN01 FOCUS ON+ FOCUS OFF.mp4
TUTORIAL 18 / 22
Minimize to the Bubble and restore the window
Keep TBM available without leaving a full window in the way. The Bubble is a movable, compact version of the workspace that restores on click.
Follow these steps
1
With the main TBM window open, click the X at its top-right corner.
2
Notice that TBM collapses to a small floating Bubble rather than exiting.
3
Drag the Bubble to a convenient place on your screen and release it.
4
Click the Bubble without dragging to restore the full workspace.
5
For size or window-layer preferences, click SET to open Settings.
6
Adjust Bubble size, or enable Always On Top if you want the workspace to stay above other windows, then click Save.
YOUR RESULT
You can move between a compact floating Bubble and the full workspace when needed.
REAL V16 DEMONSTRATIONO01 Bubble, restore and always-on-top.mp4
TUTORIAL 17 / 22
Launch several saved resources together
Launch all the websites, files or applications needed for one job from the same Sub-Tab. This is faster than opening each resource separately.
Follow these steps
1
Open the Sub-Tab containing the resources for your task.
2
To open everything in the current Sub-Tab, make sure no Items are selected and click OPEN ALL at the bottom.
3
To open only certain resources, hold Shift and click the Items you want; confirm they are highlighted.
4
Click OPEN SELECTED at the bottom of the window, or right-click a selected Item and choose Open selected.
5
If TBM asks for confirmation before opening many resources, review the request and confirm only if you intend to launch them.
6
Switch to the applications or browser pages that Windows opens.
YOUR RESULT
Your selected working set opens together using each Item's original application or website.
REAL V16 DEMONSTRATIONN07 Launch a working set.mp4
GUIDED WALKTHROUGHS
Import a starting structure
Use Desktop Management to bring in selected categories and website collections safely.
TUTORIAL 09 / 22
Import a Main-Tab and Sub-Tab CSV
Build a complete Main Tab and Sub-Tab structure from a spreadsheet, rather than creating every tab by hand. The CSV import adds to the chosen Desktop without overwriting existing tabs.
Follow these steps
1
Open the Desktop selector at the top of TBM and choose Open Desktop Management.
2
Create the destination Desktop with + Add NEW Desktop, or locate an existing Desktop row.
3
Click Download CSV Template near the top of Desktop Management and save the template to your computer.
4
Open the template in your spreadsheet program. Put Main Tab names in column A and their corresponding Sub-Tab names in column B; save the completed file as CSV.
5
In the destination Desktop row, click Import CSV and select the completed CSV file.
6
Read the import summary, including added tabs and skipped rows or duplicates, and acknowledge it.
7
Click Done to close Desktop Management; switch to the destination Desktop to inspect the imported tab structure.
YOUR RESULT
The Main Tabs and Sub-Tabs appear on the selected Desktop through a safe merge.
REAL V16 DEMONSTRATIONC10 Import CSV the correct way.mp4
TUTORIAL 12 / 22
Browse Topics and import curated links
Build useful website collections quickly from the curated Topics library. Import only the categories or individual links that belong to your project.
Follow these steps
1
Open the top Desktop selector and choose Open Desktop Management.
2
Create a new Desktop first if you want a separate collection, or locate the Desktop that should receive the links.
3
Click Browse Topics in that Desktop's row.
4
Use the search box or expand the topic tree to find Main Tab categories, Sub-Tab groups and individual website links.
5
Tick only the categories and links you want; adjust your selection before saving.
6
Click SAVE TO followed by the destination Desktop name.
7
Read the smart-merge summary, then click Done in Desktop Management and open the selected Desktop.
YOUR RESULT
The chosen topic structure and website Items are added while existing workspace content stays intact.
REAL V16 DEMONSTRATIONN02 Browse Topics and import curated links.mp4
TUTORIAL 13 / 22
Import browser bookmarks from HTML
Bring an existing browser bookmark collection into TBM without opening every link manually. Importing uses a browser-exported HTML file, not the live bookmarks database.
Follow these steps
1
In Chrome, Edge, Firefox or another compatible browser, open its bookmark manager and export your bookmarks to an HTML file.
2
In TBM, open the Desktop selector and choose Open Desktop Management.
3
Create or identify the Desktop that should receive the imported bookmarks.
4
Click Import Bookmarks in the correct Desktop row.
5
Choose CHOOSE BOOKMARK FILE, select the exported HTML file, and wait for its folder and link tree to load.
6
Search or expand the tree, then check the folders or individual bookmarks you actually want.
7
Click IMPORT TO followed by the Desktop name, read the smart-merge summary, and click Done in Desktop Management.
8
Open the destination Desktop and inspect the new Main Tabs, Sub-Tabs and website Items.
YOUR RESULT
Selected bookmarks are organized into TBM without changing the browser's original bookmarks.
REAL V16 DEMONSTRATIONN03 Import browser bookmarks from HTML.mp4
GUIDED WALKTHROUGHS
Make it your own
Adjust the appearance and save a reusable design.
TUTORIAL 20 / 22
Change colors, fonts, Items, and Dark Mode
Make ToolBoxManager comfortable to use by adjusting its colors, type, Item size and display mode. V16 previews appearance changes as you work in Settings.
Follow these steps
1
Click SET in the top bar to open ToolBoxManager Settings.
2
In Appearance, choose a palette or change the custom background and font colors using their Pick controls.
3
Set Main Tab and Sub-Tab font, size and color options independently. Adjust the Sub-Tab dot settings if you use them.
4
Scroll to the Item and workspace controls to change icon image size, label size or other display preferences.
5
Use the Dark Mode toggle at the top of Settings to switch between light and dark presentation.
6
Watch the main TBM window preview; click Save to keep your settings, or Cancel to discard the changes.
YOUR RESULT
Your visual preferences are applied to the workspace and its related windows.
REAL V16 DEMONSTRATIONO03 Color font icon and Dark Mode examples.mp4
TUTORIAL 22 / 22
Build, save, and switch a Saved Design
Save a preferred visual arrangement so you can reuse it later. Saved Designs store appearance choices rather than duplicating your Desktop content.
Follow these steps
1
Click SET and open the Appearance area of ToolBoxManager Settings.
2
Adjust the background, colors, Main Tab and Sub-Tab styling, Item sizing or other visual controls until the preview looks right.
3
In the Saved design area, click Save As...
4
Enter a unique, descriptive name in the Save Appearance Design dialog and confirm.
5
Click Save at the bottom of Settings to keep the new design.
6
Open SET again and choose Default or another named entry from the Saved design dropdown to switch appearances.
7
Click Save to keep the selected look; to replace a named design with your current appearance use Update, or use Delete to remove a user-created design.
YOUR RESULT
You can return to a saved visual style without rebuilding any tabs or changing your Items.
REAL V16 DEMONSTRATIONSaved Designs- build one- save it- switch back.mp4
KEEP YOUR WORK SAFE
Backup, Restore and Upgrade
Keep a copy of your workspace before making software changes.
SAFEGUARD YOUR WORK
BACKUP and IMPORT: safeguard your TBM workspace
Use the two clearly labeled buttons on the main TBM window. BACKUP exports the workspace to a file. IMPORT brings a saved workspace back; PAID can choose a non-destructive merge or full restore.
BACKUP
Save a safe copy
Create a Complete Backup JSON file with your Desktops, Main Tabs, Sub-Tabs, Items, Notes and relevant settings.
Available in LITE and PAID.
IMPORT
Recover or add a workspace
Select an existing TBM backup. Choose Merge Desktops or Restore Complete in PAID.
Full backup import requires PAID.
1
In the main TBM window, click BACKUP. Save the exported .json backup in a safe, easily located place such as your Desktop or backup folder.
2
Keep another copy before upgrading or reorganizing multiple Desktops.
3
To recover your data, click IMPORT in the main TBM window and select your saved backup JSON.
4
Choose Merge Desktops to keep existing data and add/match imported Desktops. Choose Restore Complete only when you intentionally want the backup to replace the current complete workspace and settings.
5
Confirm the operation, check the success message, then inspect the imported Desktops and Items.
PORTABLE UPGRADE
Upgrade ToolBoxManager without losing your workspace
Because TBM is a portable Windows application, its upgrade process is straightforward. Always take a Complete Backup before replacing anything, then confirm your work survives the upgrade.
BACKUP→CLOSE TBM→DOWNLOAD NEW ZIP→EXTRACT→RUN + VERIFY
1
Open your existing TBM and click BACKUP. Save the JSON file to your Windows Desktop and keep it untouched.
2
Close TBM completely, including any floating Bubble.
3
Download the latest release package from the official ToolBoxManager website. Extract it into your existing TBM folder or a separate new-version folder, following the instructions included with that release.
4
Launch the new ToolBoxManager.exe. Sign in with your TBM email/password if requested. Never delete your current workspace data as part of an upgrade.
5
Check that your Desktops, Tabs, Notes and Items are present. If you need to restore, click IMPORT and use the backed-up JSON. Choose Restore Complete only if replacing the current workspace is intentional.
WORK YOUR WAY
Language, licensing and first launch
Everyday answers and customer-friendly account guidance.
WRITE YOUR WAY
Text that flows both ways: LTR + RTL
English runs left to right. Right-to-left languages include Hebrew, Arabic and Persian. TBM is designed for notes that may contain either direction, and even a mixture in the same project.
How to work with mixed-language Notes
1
Create a Note and begin typing. The text direction can follow the first strong characters, where supported.
2
Write an English heading, then add a phrase in a right-to-left language where needed.
3
Use the Note editor’s direction controls if a mixed-language line needs adjustment.
4
Review punctuation and numbers visually, especially when mixing scripts on one line.
Left to rightProject deadline: FridayRight to left examplesשלום, זהו פתק לדוגמהمرحبا، هذه ملاحظةسلام، این یک یادداشت است
PLANS EXPLAINED
LITE gets real work done. PAID gives you room to grow.
LITE has no session countdown and preserves your workspace. PAID expands capacity and unlocks complete backup import/restore.
GET STARTEDLITE
Full-featured workflow basics with defined capacity limits.
GROW WITHOUT THOSE LIMITSPAID
More Desktops, Main Tabs, Sub-Tabs and Items, plus advanced import and design choices.
Feature
LITE
PAID
Time limit
No timer
No timer
Desktops
Up to 3
Up to 25
Main Tabs
9 per Desktop
No LITE cap
Sub-Tabs
3 per Main Tab
No LITE cap
Items
9 per Sub-Tab
No LITE cap
Drag-and-drop / Notes
Yes
Yes
Backup export
Yes
Yes
Full backup restore/import
Upgrade required
Yes
Appearance controls: fonts, color and size
Available
Available
Focus ON / OFF
Available within LITE tab cap
Available
Desktop Switcher
Up to 3 Desktops
Up to 25 Desktops
Dark Mode / Saved Designs
Available
Available
Import CSV structure
Up to 9 Main Tabs / 3 Sub-Tabs visible
Full imported structure visible
Import Bookmarks HTML
Up to 9 Items per Sub-Tab visible
Full imported collection visible
Browse Topics catalog
Content above LITE limits retained but hidden
Full imported collection visible
If your import includes more material than LITE can display, the extra content is preserved and becomes accessible after upgrading.
LICENSED CUSTOMER GUIDE
ToolBoxManager Licensing: your floating-license user guide
Your PAID license allows you to use TBM on the computers assigned to your account. The floating-license system lets you view and manage licensed devices without changing the files in your workspace.
DEVICE 1Current computer
DEVICE 2Other computer
NEW COMPUTER?Release an unused device or follow the replacement flow
1
After purchasing, read the separate ToolBoxManager WELCOME email. Use your TBM credentials, not your JVZoo account credentials.
2
Open the TBM application and sign in with your TBM email and password. Your paid license is associated with that account; no serial number is required.
3
Click the green LICENSED badge in the main window or use Settings → Manage Licensed Devices.
4
Review your licensed computers, occupied seats and available seats. The current computer is identified in the device list.
5
If you no longer use a computer, select its device entry and choose its supported Release action. If all seats are occupied while signing in on another computer, follow the guided replacement flow and its displayed allowance.
6
Return to TBM on the computer you want to use and sign in or validate again. Releasing a computer frees its seat but does not remove your TBM account or delete any files.
ToolBoxManager account welcome email Click to enlargeLicensed Devices: view or manage current allocations Click to enlarge
INSTALLATION & SMARTSCREEN
First launch on Windows 11
ToolBoxManager is portable: unzip it into a folder and run the application. A newly distributed EXE may trigger a SmartScreen reputation warning.
1
On your Windows Desktop, create a folder named TBM.
2
Download the ToolBoxManager ZIP from the official toolboxmanager.com website into that folder.
3
Right-click the ZIP, choose Extract All, and extract the application files into your TBM folder.
4
Open the extracted folder and double-click ToolBoxManager.exe.
5
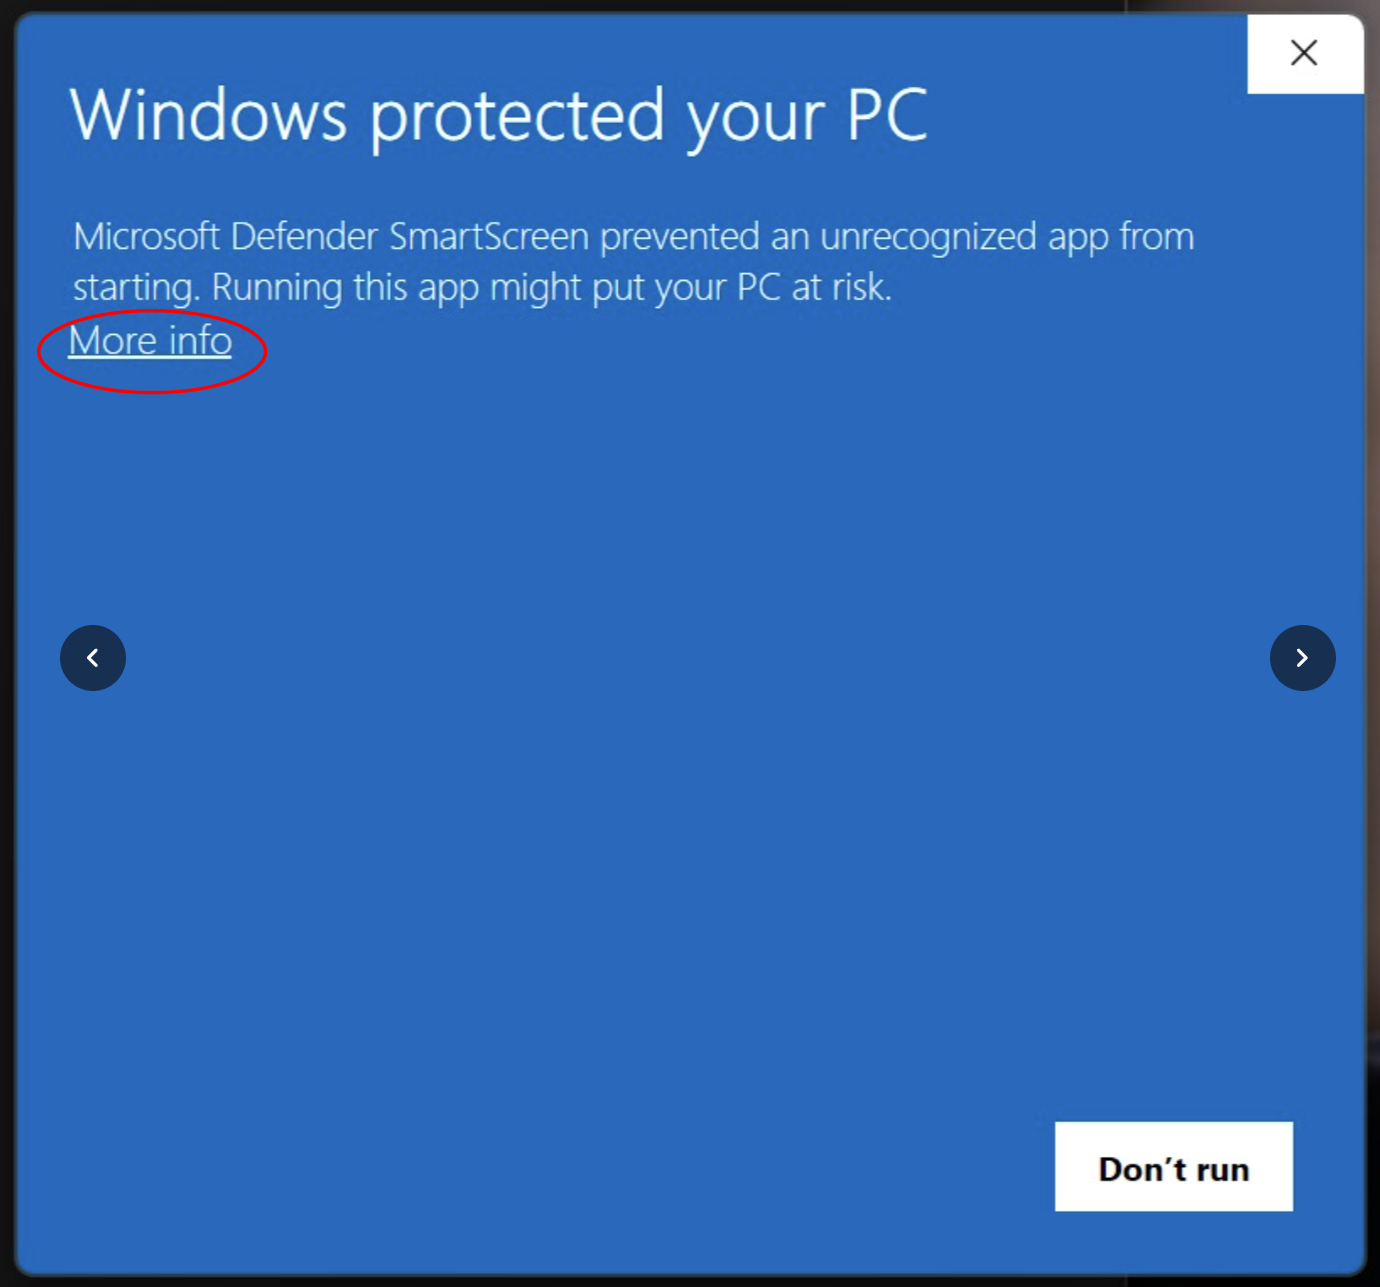
If Windows shows the standard “Windows protected your PC” warning pictured here, click More info.
6
Check the app/file information. If it matches the official ToolBoxManager file you intentionally downloaded, click Run anyway.
7
If the file came from another source or Windows shows a different security alert, do not bypass it. Obtain a fresh official copy or contact support.
8
When TBM opens, follow the on-screen sign-in instructions. JVZoo purchase credentials are separate from the TBM account information sent by email.
Example Microsoft Defender SmartScreen reputation warning. Your Windows version may display a different layout.
Check the source first
These instructions apply only to the expected SmartScreen reputation warning for your verified official download. Never bypass an unrelated or unexpected security alert.
REAL-WORLD EXAMPLES
Three complete workflows
See how the same flexible structure works for different needs.
CASE STUDY 01
Marketing launch: keep every resource ready
A product launch uses a copy brief, creative files, tracking sheets and reference websites.
CASE STUDY 01 · Marketing hierarchy
DESKTOP (PROJECT)MARKETING
MAIN TABCAMPAIGN
SUB-TABBRIEFLaunch brief · plan
SUB-TABASSETSImages · design files
SUB-TABRESEARCHCompetitor sites · Notes
MAIN TABCHANNELS
SUB-TABEMAILDrafts · campaign links
Keep planning, research and execution together without moving your source files.
Reorder Items so the most relevant sources appear first, and reopen them as needed. Detailed instructions ↗
WORKING RESULT
Your source links, excerpts and reading documents remain together in a clear research Desktop.
UNDER THE HOOD
Performance & privacy, by design
TBM is a lightweight, portable workspace for Windows. It helps organize the resources already on your computer without forcing them into a new cloud filing system.
▣
Native & portable
Launch the standalone application without a traditional installer. Keep your TBM folder where you choose.
◴
Resource-conscious
A lightweight interface designed to work alongside your existing applications and project files.
◇
Your workspace stays yours
Your source documents and personal project workspace remain on your computer. Smart Visual Pointers do not upload or relocate your original files.
⇄
Non-intrusive navigation
Switch between project Desktops, narrow the view using Focus, or minimize into the floating Bubble.
PAID licensing includes a floating-license management system for authorized devices.
FIND YOUR ANSWER
Troubleshooting and everyday questions
Short answers for the situations that matter most.
Windows shows “Windows protected your PC.” What should I do?
Microsoft Defender SmartScreen sometimes shows this standard reputation warning when you first open a newly downloaded or unfamiliar app. First make sure your ToolBoxManager copy came from the official toolboxmanager.com website. On the warning shown below, click More info, check the application information, then choose Run anyway only if it is the expected official download. The warning is common on first launch, but Windows may show it again in some circumstances. If the file came from another source or the alert looks different, do not bypass it.
The standard Windows warning. Select More info only after checking the download source.Can I try ToolBoxManager before buying?
Yes. If you would like to experience ToolBoxManager before purchasing, email [email protected] and request access to the LITE edition. We will help you get started.
Can I pay with cryptocurrency?
For a cryptocurrency purchase, please contact [email protected] directly. We will explain the available payment arrangements before you proceed.
Can I purchase multiple ToolBoxManager licenses for my team or business?
Yes. If you need multiple licenses for your team, business, or several users, email [email protected]. We will help you arrange a tailored licensing solution that fits your needs, with fair pricing.
Can I get a discount?
ToolBoxManager is a premium, purpose-built productivity application developed through extensive design, engineering and refinement. Instead of a recurring subscription, we offer a single, competitively priced payment with ongoing product updates. We have already priced it well below what we believe its distinctive capabilities and long-term value justify, so we do not routinely offer additional discounts.
Will TBM move or copy my original files?
No. It stores Smart Visual Pointers. The original files, folders and webpages stay where they were.
Why does a pointer no longer open its file?
The original Windows file may have been moved, renamed or deleted outside TBM. Check the original location and update your workspace reference.
Can I delete an item from TBM safely?
Yes. Removing a pointer from TBM does not delete the original file or webpage. Deleting a whole TBM tab or Desktop removes that TBM organization, so confirm before doing it.
Why can I not add more tabs or restore a backup in LITE?
LITE has visible capacity limits: 3 Desktops, 9 Main Tabs per Desktop, 3 Sub-Tabs per Main Tab and 9 Items per Sub-Tab. Full backup import requires PAID.
Why is my CSV import not creating links?
The CSV structure importer creates Main Tabs and Sub-Tabs using two columns. For web links, use drag-and-drop, Browse Topics or bookmark HTML import.
How can I see all my Main Tabs again?
Switch FOCUS OFF. FOCUS ON is only a view limit and does not delete your hidden Main Tabs.
How do I keep my own color and font settings?
Open Settings → Appearance and use Save As... to create a named Saved Design. Use its update controls when you refine it.
Can I restore a backup after moving my Windows documents?
The TBM backup restores workspace pointers and settings, not copies of the target documents. If local files moved, their paths may need updating.
Do JVZoo credentials work for TBM?
No. JVZoo is the purchase platform, not your TBM application login. A separate ToolBoxManager WELCOME email provides your TBM account/username and password or password setup instructions. Check your inbox and spam folder if it is missing.
Will a new software release replace my Desktops with sample data?
Existing customer workspaces are preserved in normal compatible upgrades. Make a Complete Backup before updating and follow release-specific instructions.
Where are my original documents stored?
Your documents and folders remain at their original Windows locations. TBM keeps Items that point to those resources.
Does TBM need an installer?
No. Extract the official portable release and run ToolBoxManager.exe. Keep the application in a dedicated folder.
Can I use a floating license on another PC?
Open Licensed Devices and release an unused computer or follow the replacement process if your device seats are full.
Can I import links without replacing my existing project?
Yes. Browse Topics, CSV structures and browser bookmark import add or smart-merge into the selected Desktop. Restore Complete is a separate backup option.
PERSONAL SUPPORT
Need a hand? We are here to help.
If anything is unclear, something does not behave as expected, or you simply need guidance, contact ToolBoxManager support. We will be happy to help you get back to your work.